Insulation is important to have a comfortable and energy-efficient home…we all know this. Check out these 25 things to consider when thinking about adding insulation to your house.
Upgrade Your Insulation
If you’re planning to buy an insulated door because you want to save energy or keep your garage warm, it’s worth spending about 15 to 20 percent extra to upgrade from extruded polystyrene to polyurethane insulation. The insulating effectiveness of a garage door is its R-value. The larger the number, the better it insulates. According to Clopay, upgrading from 2-in. polystyrene to its Intellicore (polyurethane) raises the insulating value from R-9 to R-18. That’s a lot of bang for the buck.
Avoid Paper-Faced Insulation Where Possible
Don’t buy paper-faced insulation for standard wall insulating jobs. The paper facing makes cutting the batts difficult. And it’s hard to create a tight vapor retarder with paper-faced batts. If you do choose to use this, remember to always face the paper to the room and not the wall.
Missing Insulation Feeds Mold
Warm air seeks gaps in the insulation, and when it hits colder surfaces as it flows out of or into the house, water condenses—which then feeds mold. These spots often occur on outside walls near floors or windows, at corners and around outlets and lights. If the mold disappears after cleaning it and lowering indoor humidity with a dehumidifier or vent fan, just keep an eye on it. If it recurs, open the wall and fix the problem.
Add Attic Insulation
In most homes, but especially in older homes, adding insulation in the attic will cut heat loss. At a minimum, homes should have attic insulation between R-22 and R-49 (6 to 13 in. of loose fill or 7 to 19 in. of fiberglass batts). Check with the local building department to find the recommended level for your area, or visit EnergySavers.gov.
Stick your head through the attic access door and measure how much insulation you have. If your insulation is at or below the minimum, adding some will lower your heating bills. If you need to add more, go with loose-fill insulation rather than fiberglass batts even if you already have fiberglass. Loose fill is usually composed of cellulose or fiberglass and lets you cover joists and get into crevices. Pros charge about 70?? per sq. ft. to blow in 7 to 8 in. of insulation. You can rent a blower ($55 a day) and do the job yourself for less than half that cost, but it’s a messy job and you have to watch your step so you don’t go through the drywall ‘floor’ in the attic.
‘Eighty percent of houses built before 1980 are underinsulated.’ —Department of Energy.
Don’t Spin the Bit In Insulation
Itch Remover
A sticky lint roller pulls those nasty insulation fibers off your skin and clothes—and reduces itching later.
Insulate Pipes
Condensation dripping from cold pipes can contribute to basement water problems. Cover cold water pipes with foam pipe insulation to stop condensation. The foam insulation is inexpensive and easy to cut with scissors.
Insulate Walls
Insulate exterior walls to prevent condensation. In cold climates, insulating basement walls also saves energy and reduces your heating bill. But don’t cover the walls with insulation if water is leaking in from outside; you’ll just create a potential mold problem.
Seal the Rim Joists
How to Find the Gaps
Before you crawl into your attic, make a rough sketch of the floor plan and the ceiling below the attic. Sketch in the walls, the chimney, the main plumbing stack, ceiling electrical fixtures and lower sections of ceiling. They all have high leak potential, and your sketch will help you find them when you’re in the attic.
To help generate actual leakage, place a box fan in a window so it blows air into the house. Then close all other windows and doors. Tape cardboard around the fan to eliminate large gaps. When you turn the fan on high, you’ll slightly pressurize the house, just like an inflated balloon. Then when you’re in the attic (with the hatch closed), you can confirm a leaky area by feeling the air coming through. You may even spot the insulation blowing in the breeze.
Another helpful sign is dirty insulation (photo above). Insulation fibers filter the household air as it passes, leaving a dirt stain that marks the leaky area.
Use Foam or Caulk for Small Gaps
It’s best to keep your can of expanding foam and caulk gun handy and plug the obvious electrical cable holes and fixture boxes as you move around working on the bigger air leaks. Make sure you get to the plumbing vent because the gap around it is usually large. Also look for the 2×4 top plates (framing) of interior walls and follow them, keeping a sharp eye out for electrical cable holes and dirty insulation, which would indicate a gap or long crack between drywall and a wood plate. Seal these with caulk.
Work carefully with expanding foam because it’s super sticky and almost impossible to get off your clothes and skin. Wear disposable gloves when working with it.
Weatherstrip Hatches and Doors
After sealing the attic bypasses, push the insulation back into place with an old broom handle or a stick as you back out of the attic. Then finish up by sealing the access hatch with self-sticking foam weatherstrip. You may have to add new wood stops to provide a better surface for the weatherstrip and enough room for hook-and-eye fasteners. Position the screw eyes so that you slightly compress the weatherstrip when you latch the hatch. Use a similar procedure if you have a hinged door that leads to the attic.
Use Mold-Resistant Building Materials
If you need to build or rebuild an area where moisture has been a problem, use materials that resist mold growth and aren’t affected by water. Construct walls with pressure-treated wood and rigid insulation and cover the walls with paperless drywall, which has nothing for mold to feed on.
Cut Around the Window With a Recip Saw
So don’t bother pulling the nails or screws out of an old window. Just run a recip saw between the window and the framing and cut the fasteners and the foam at the same time. You may want a buddy on the other side of the window to keep it from falling out when you’re done cutting around it. With a long enough blade, you can even slice through the nailing flange at the same time. That’s important if you’re trying to save the siding around the opening.
Use a Leak Detector to Find Drafts
If your home is drafty, use a thermal leak detector (several brands are available online). The battery-operated handheld tool uses infrared sensors to identify spots that are warmer or colder than the surrounding area, signifying an air leak or poor insulation.
Just point the Thermal Leak Detector at windows, walls, and ceilings. When the detector finds a cold or warm spot, the LED light changes from green to red (for warm) or blue (for cold).
Of course, you’ll still have to do some detective work to figure out what the problem actually is and how to fix it.
Seal Small Attic Holes With Foam and Caulk
Hot air rises, so leaks in the ceiling are even worse than leaks in walls. And in many homes, this airflow through ceilings and into the attic is the No. 1 source of heat loss. You can check for leaks around ceiling light fixtures and the attic access door using an incense stick. But the only way to detect other leaks is to crawl up into the attic, pull back the insulation and look for them. Most leaks occur where chimneys and electrical and plumbing lines pass through the ceiling. Although the attic is a nasty place to work, plugging these leaks is a simple project—mostly caulking and foaming gaps.
Cut Fiberglass Batts to Exact Widths
It’s easy to insulate your walls with fiberglass insulation (at least when they’re open!), but the job still requires attention to detail to get the maximum benefit. Every gap and compressed batt leaves a path for heat or cold to escape.
Measure and cut the fiberglass batt for an exact fit. Add about 1/4 in. to the measurement to ensure a snug fit. Use a 4- to 6-in.-wide board or strip of plywood as a straightedge to guide your utility knife. Line up the edge of the board at the proper width, compress the insulation and cut it with a sharp utility knife. A scrap of plywood under the batt will protect finished floors and keep the blade from dulling on concrete.
Avoid Stuffing
Don’t stuff full-width batts into spaces that are too narrow. Crumpling batts to fit narrow spaces creates uninsulated air pockets. And packed insulation has a lower R-value.
Notch Batts Around Electrical Boxes
Cut notches in batts to fit snuggly around electrical boxes. Airtight boxes have gaskets that seal against the drywall.
Put the batt in place, and use scissors to snip around the box. Tuck the snipped-out plug of insulation behind the box. Don’t wrap fiberglass batts around electrical boxes or stuff full batts behind them. That creates gaps and air convection routes around the box.
Split Batts Around Cables and Pipes
Split apart the batts to fit around wires and pipes to get the full value of the insulation. Fiberglass batts have a vertical weave that allows you to easily tear it open for insulating around electrical cables.
Clean Attic Venting or Invite Ice Dams
Poor attic ventilation can cause ice dams in the winter months, increase cooling costs, create a home for mold and reduce the life of shingles during the dog days of summer.
Over time, the vents located in your soffits and on some gable-end wall vents get clogged with dust and debris and lose their effectiveness. Clean them with a leaf blower or compressed air. You could use a pressure washer but stick to a couple quick passes because you don’t want to saturate the attic insulation with water. Clean the vents every few years, unless you live near a lot of trees with floating seeds, which can clog vents in one season.
What’s R-Value?
R-value is a measure of the resistance to heat flow, a way of indicating insulation’s ability to stop heat from moving through it. The higher the number, the better. two factors determine that number: the thickness of the insulation and the insulating ability of the material. The fiberglass batts shown here, for example, are all the same thickness but differ in R-value because of their different densities.
Plan Ahead
Insulate Hot Water Pipes
Packaging Fragile Parcels
If you’re sending a fragile gift, protect it with expanding foam sealant. First, double-wrap the item in plastic bags, then cover the bottom of your box with 2 to 3 in. of foam. After about 45 minutes, when the foam has expanded and begun to harden, put the item in the box. Then line the box with a plastic bag large enough to cover the item and the sides of the box. Partially fill the box with foam, covering the gift but leaving a couple of inches for the foam to expand. Let the foam set overnight before handling the package. If the foam expands past the top of the box, just cut away the excess with a knife. A can of regular foam?not the ‘minimal expanding’ version? fills almost a cubic foot. Who knew?
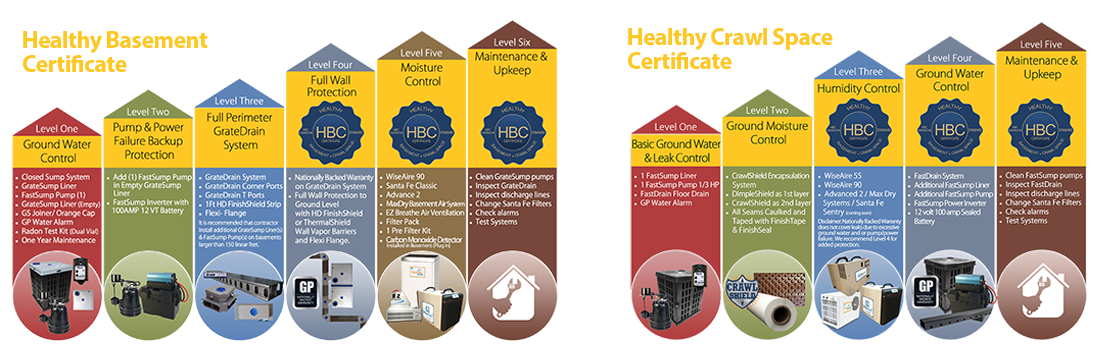
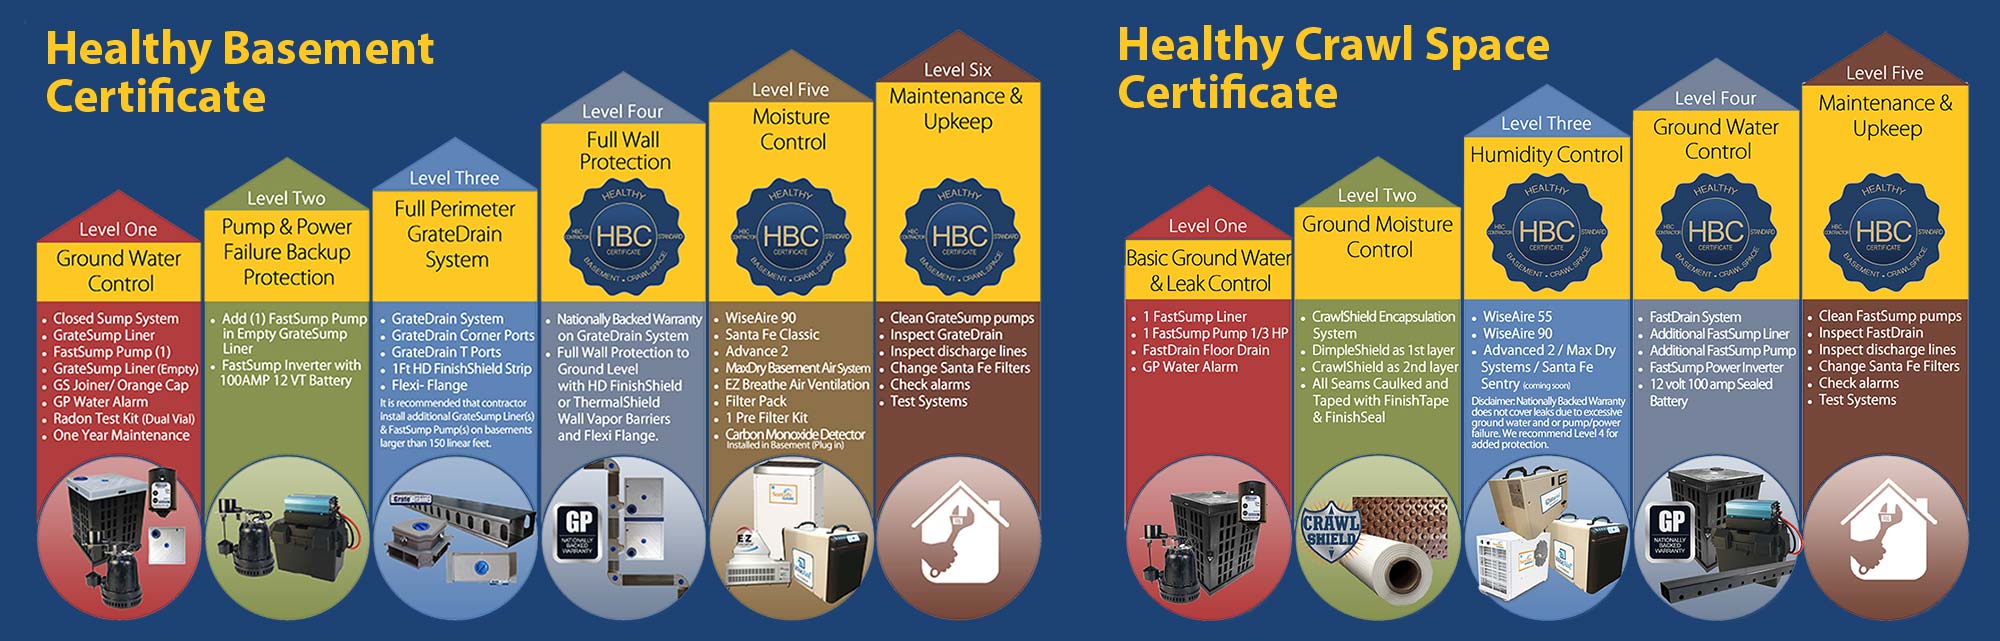
If you want to have professional advise with a FREE insualtion inspection, please call Summit Waterproofing today at (703) 382-2984 and we will get you on the schedule!